Saturday 28 December 2013

Guerrilla Gardening Perth

October/November '11 - March/April '12 - Perth WA

Although we had a very small patio-ed yard behind our little "two up, two down" townhouse in Perth, there wasn't much earth that we could use for planting.

M built some raised beds in patches of the yard where there weren't any bricks - using other bricks that we'd found on walks around the neighbourhood (skip-diving) - and we managed to grow some (tiny) vegetables and a huge watermelon plant...no melons ever appeared through, I think the roots may have been too confined in the small space, the plant really flourished though and it had small yellow flowers for about a month of Summer.

We noticed the area behind the townhouse - just behind our parking bay - seemed to be all scrub and weedy wasteland, it was pretty much out of sight from the path and we were the only people (apart from friends) who came up that way..... and we realised we could reclaim a patch of it and extend our small garden, it was close enough to water and pretty much hidden from view 

Guerrilla Garden - somewhere in Mount Lawley

cherry tomatoes, carrots, beetroot, butternut squash, courgette

We started by clearing the weeds and assessing the soil - mostly sandy - and as the area was in a suntrap with little shade, it got really hot up there, hmmmmm...

We weren't deterred and within a week or two - after weeding and digging some bags of manure compost through the sand - we'd planted some cherry tomatoes, potatoes (from sprouting potatoes we had in the kitchen), beetroot, onions as well as baby sweetcorn, butternut squash and a courgette. This small space was the biggest space I'd ever had for a garden and our local garden centre had a nice selection of seedlings and seeds - carrots and peas we grew from seed and the rest of our experimental seedlings were mostly vegetables that we liked the sound of and really wanted to try


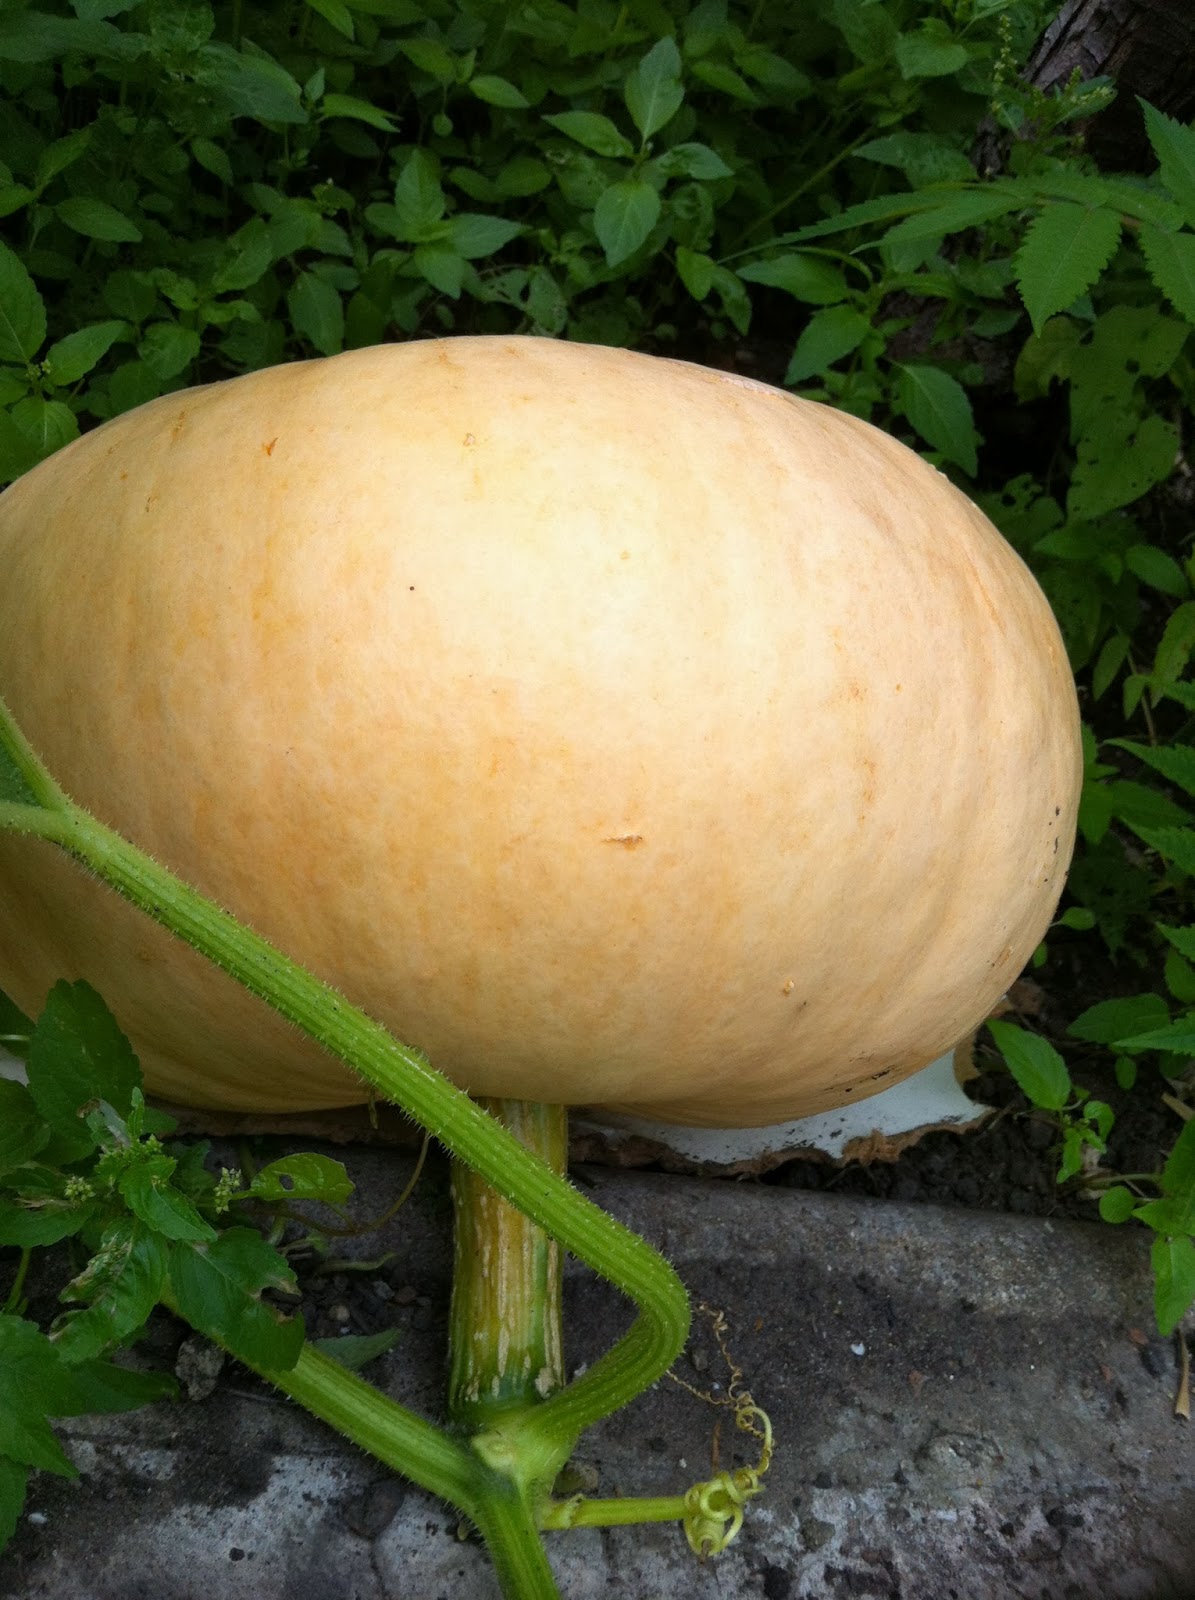
The tomatoes really took off in the Summer sun and in a matter of weeks they were 3ft tall and still growing, the butternut squash spread itself liberally across the small patch we'd cleared and started wandering down the slope towards the car bay. 


After a slow start, our potatoes did well for a few weeks - we had about six plants in total, from a variety of potatoes - but they got ravaged by a infestation of black furry caterpillars that devoured chunks of the plants overnight. I caught and disposed of as many of the caterpillars as I could, but unfortunately a lot of the plants died and after harvesting, we ended up with a small selection of baby potatoes, just enough for a meal for two

Harvest

Baby carrots and beetroot

Fantastic guerrilla gardening website here

Thursday 12 December 2013

I heart you pre loved


I've always loved going to charity shops. I think at this stage, roughly 70% - 80% of the clothes I own (apart from my underwear) are pre loved, and at least 90% of our furniture is either pre-loved, or re-loved, so rescued from the side of the street...or out of a skip and fixed up.

I love charity shops for so many reasons; the main ones are easy to tick off; it’s great helping the charity out, prices are so much more reasonable, I love that I’m helping recycle clothes, I won’t get into the sheer volume of power consumed in order to make a single white shirt (this is apart from the mostly, gross exploitation of the people making the clothes) and this “wear it once and throw away” attitude some people have drives me nuts! To me, there’s nothing better than finding a “hidden gem” in a charity shop or in a skip, for example....

                                                             My ceramic baking hen


I first spotted ceramic baking hens in Habitat in Dublin about ten years ago. If you’re not familiar with Habitat, it was one of my favourite stores, until I realised that while the products are lovely, it’s very much a life style brand and although it has such beautiful “retro” cups and plates etc, they are mass produced and they’re all sold at modern, expensive prices. So I would browse in Habitat, never actually buy anything, just sigh over the lovely faux vintage tea sets. I spotted a terracotta baking/roasting hen there one day that I fell in love with, although I couldn't afford at the time (being a poor art student and everything) and so I just filed it away in the “things I’d like to have some day” section of my mind....

Then in 2011, myself and M were still living in Perth and while walking around Fremantle one day, (don’t ask me why) but I was trying to describe this terracotta baking hen to M, without much success... “you see, it’s a hen shaped baking dish that you take apart and put a chicken inside and roast it and....it’s amazing”.... anyway, we headed into Vintage Vinnie’s (Australian version of St Vincent de Paul’s) and there on a shelf, just inside the door, was a white ceramic baking hen....Which I took as fate, although how my fate is entwined with a ceramic baking hen, I really couldn't say at this stage....so, I pounced on it and managed to get it for the fantastic price of $20, and both of us (ok, mostly me) were just thrilled by the oddly timed coincidence of my trying (and failing) to describe a baking hen I'd seen, some ten years earlier in Dublin and then finding an even more beautiful, vintage version literally minutes after I'd been talking about it. 

This gorgeous ceramic hen has surpassed all my expectations, it’s (obviously) perfect for roasting chickens; the bird doesn't need basting or even checking during cooking, as the glazed ceramic inside keeps the chicken beautiful and moist while it’s in the oven; “fall off the bone” tender is the best description of the meat after an hour and a half in the ceramic hen; it even helps the chicken skin turn a nice golden brown during cooking, with the lid still firmly sealed in place (which must be some kind of voodoo) and it is just fantastic for any kind of slow cooking; casseroles, roast lamb, I've even roasted pumpkin and squash in it, which was delicious and stayed really juicy!

I suppose the point I’m trying to make is, I get so much more out of finding something in a charity shop, or even on the street and fixing/remaking it than I ever do just buying it in a regular shop or online. Even if it means waiting a while, it's usually well worth the wait...

Friday 29 November 2013

Perth tales...a strange avocado


After many, many unsuccessful attempts over the years, an avocado pit, that I'd carefully suspended in a jar of water using three toothpicks, like so, sprouted a little root. According to popular opinion (i.e. I read it online) this should take three to six weeks to happen...mine took ten...and then, nothing...the big root continued to grow, slowly, with no sign of any leaves, just a big root dangling into the jar of water.


So finally, I planted it, and it sat in the plant pot, looking like a dead stone for another week or two.....


Then, the outer shell split and came off and three little shoots poked out


I debated plaiting the shoots together as they grew to see if that would affect the shape of the tree...but decided against it, it was so fragile and I was so excited that it was actually growing, I didn't want to do anything that might damage the plant


I looked after it carefully, moving it around the house to give it the best light - it didn't like direct sunlight and putting it in the garden resulted in the plant wilting literally within minutes - 40 degrees summer sun in Perth was way too harsh for my little avocado


On a side note - it may have been suggested during these months of moving the avocado around the house, trying to find the best light without too much of a cross breeze from the air con that I was "mollycoddling" the plant.... but I didn't care, I was growing my own avocado tree


Then, one sunny day, I transplanted the avocado from its smaller purple pot, into a larger ceramic one.....and it went limp over the space of a few days...and died.


                                                                                   Fin 


Sunday 20 October 2013

Fig Preserve with Vanilla and Ginger


I found this gorgeous recipe for fig and vanilla preserve in my book Wild Sourdough – by Yoke Mardewi -this is a really fantastic book with lots of easy to follow (and tasty!) sourdough bread recipes. Myself and M went to one of Yoke’s workshops in basic sourdough bread while we were living in Perth - there will be a post on this soon -we had such a fantastic experience with Yoke and really enjoyed her classes, please click here for a link to Yoke’s website.


Ingredients

1kg figs
750 g sugar
1 vanilla pod
1 lemon
5 cm/couple of chunks of preserved stem ginger

Helpful Tip - Try to buy the figs the same day you intend on making the jam, otherwise (if you’re me) you will need to pick out all the lovely figs that have somehow turned soft and slightly furry overnight.

Start by carefully picking through your figs, discard (or compost) any figs that have turned soft or furry or if it’s not too mushy, cut out the bit that’s gone bad and use the good bits


Reweigh your figs. Realise that you now only have 600 g of figs rather than 1 kg. Recalculate and reweigh your sugar (it should now be 450 g) so your sugar to fig ratio isn't going to leave you with a preserve so high in sucrose it makes your teeth squeak.

Cut the remainder of figs into chunks, open the vanilla pod with a sharp knife and scrape out the seeds and place both vanilla pod and seeds into the preserving pan (heavy based saucepan) with the figs. Add the juice from the lemon. Simmer gently over a low heat until the figs have turned soft and gooey, stirring occasionally.


In the meantime, finely chop the preserved ginger into small chunks – sample a few chunks of the ginger while waiting for the figs to soften. Chop up more ginger

Once the figs are nicely soft, add the sugar and chopped ginger and cook on a rolling boil for approximately 7-10 minutes. Test the preserve for a set using the wrinkle test.

Bottle the fig preserve in sterilized jars, label and date. This preserve should keep for a year if the jam jars have been sterilized properly and bottled while still hot.


Because I had just over half the quantity of figs the recipe calls for, I ended up with just one and a half  jars of fig preserve. This isn't a huge quantity for the amount of effort, but the preserve is quite rich so a smear of figgy preserve on brown toast with brie is just divine and less is definitely more as the vanilla and ginger make it a very fragrant jam. The smell alone of the warm vanilla infusing with the almost spicy ginger while the figs simmered was well worth all the effort.


Fig, and figgy are some of my favourite words, alongside noodle and pudding...I am aware most of my favourite words are food related but that’s just how I roll.  


Monday 30 September 2013

Harvest time!


Galeuse d'eysines


We harvested the Galeuse d'eysines pumpkin and the Cheyenne bush pumpkin late last week....

I was so proud! I haven't weighed them yet but they're safely stored, curing in the greenhouse for the next week and a half, then I'm going to have to find a cool place in the flat to keep them.

I'm hoping to carve them both at Halloween, and maybe make a pumpkin pie... and pumpkin bread... maybe pumpkin muffins...we're going to have a lot of pumpkin to use up!

Cheyenne Bush Pumpkin

Cheyenne bush pumpkin... late, but I'm
going to give it a chance!
Small galeuse d'eysines - still on the vine


Me and my very first Galeuse d'eysines

Friday 27 September 2013

Good morning world!

I have so many posts to finish and upload, but for now, some photos I took on my way to work.

Getting up before sunrise has it's advantages sometimes, I love walking through the city as it wakes up, it's just such a shame I have to go to work after my early morning stroll


Friday 20 September 2013

Notes from the Garden.....Galeuse d'eysines pumpkin...part 2


Over the past month, the pumpkin really took off and I finally realised what it was....a Galeuse d'eysines's pumpkin..... and it should eventually look like this


Close up of Big Daddy....isn't he beautiful?

Wednesday 18 September 2013

Introduction...

After emigrating twice (to Australia and back) in just over two years, we are finally settled back in London, living in a two bed, garden flat in East Dulwich with our adopted cat, Cleo. We dream (plan.....scheme) of buying land in rural Ireland and building an eco friendly home from reclaimed, recycled materials and living as self sufficiently as possible...


Our plan is to transition our lives and lifestyle from city living, I work in an office and M works in construction, to an environmentally friendly homestead/small holdings in Ireland. I'm an amature but enthusiastic gardener, my favourite things are; cloud watching, reading, photography, homesteading, food, permaculture, reading, tea, cheese and dolce far niente


Blog Entries....

I have been planning this blog for a while so some of the posts will be backdated from earlier this year. And I  have some posts on our garden and some of the foodie courses I did while we were living in Perth last year, so there will be lots of updates on the blog in the coming weeks

Monday 16 September 2013

TomAto Tomato

After decided to take down all the tomato plants to make room for a winter greenhouse, we had a lovely mixed harvest of "Jen's tangerine" heirloom tomatoes as well as red, yellow (another heirloom variety called Galina) and green cherry tomatoes.

This was my chance to try out some chutney recipes I'd found on a fantastic blog I'd been reading recently, Life in Mud Splatted Boots and in my lovely Preserves book.

We'd been harvesting tomatoes for about a month and a half and I estimated we had picked about 5-6 kilos of tomatoes in total. Not bad, considering the small tomatoes weren't planted outside until mid June! I seriously underestimated how big the plants were going to get, and to be honest I didn't think all the heirloom seedlings would all survive being transplanted so late in the season...but they did, and they flourished! It turned into a tomato jungle and I couldn't bear to remove any of the plants - I was so proud of the heirloom seedlings that had survived and I wanted to see what the tomatoes would look and taste like. I'm going to plan the garden space properly for next Summer, and lessons learned, the Galina yellow cherry tomato plants grew to about six feet and very bushy and the bright yellow tomatoes looked beautiful next to the dark green leaves.

Seedlings - pre planting... It looks so bare!
Small tomato plants
Tomato plants before I staked them with Galeuse d'eysines pumpkin to the right - starting to take over the patio  
Close up of a spider that made his home in the tomatoes for about two months, I moved the little guy to another part of the garden before taking the tomato plants down
Galina yellow cherry tomatoes
Jen's Tangerine tomatoes, yellow Galina cherry tomatoes and bush cherry tomatoes with a couple of Summer crookneck squash
Tomato harvest


Chutney recipes and oven dried tomato recipes to follow...

Oven Dried Yellow Cherry Tomatoes

 This is the first time I tried oven drying tomatoes and it was so easy!

You will need

Tomatoes – I used yellow cherry tomatoes
Sea salt
Thyme – either fresh and finely chopped or dried


Preheat oven to 100 C

Slice cherry tomatoes in half and arrange on a wire rack on a baking tray skin side down.

Sprinkle each half tomato with salt and leave a few minutes so the salt starts to draw out some of the moisture.
Add a small sprinkle of thyme to each tomato half
Pop into the oven and leave for about 3-4 hours


The cherry tomatoes had shrunk down to almost large current size when I took them from the oven and had such a tangy tomato taste.

I put half of the tomatoes into a small plastic container and froze them and I let the other half cool and mixed them into a jar with very (very) finely chopped garlic and a good glug of olive oil. 


They will keep in the fridge in oil for about 4 days, but should not be stored like that any longer. The best way to store your dried tomatoes is to freeze them, otherwise you could risk botulinum toxin developing!


I had had some of the dried tomatoes in olive oil and garlic with a bagel smothered in cream cheese and smoked salmon, but unfortunately don’t have a photo as I ate it too quickly...

Sweet Tomato & Ginger Chutney

I found this fabulous recipe on the lovely Life in Mud Spattered Boots blog and it worked beautifully on using up some of the glut of tomatoes we had after the "harvest"


You will need

1 kg red (cherry) tomatoes – I mixed a few yellow tomatoes in with the red ones and the chutney had a lovely reddish orange colour when it was finished
1 clove garlic
1 piece stem ginger
250g granulated sugar
500ml vinegar (I used white wine vinegar, but you can use cider vinegar otherwise if you like)
1 tsp salt

Optional – finely chopped fresh chilli if you have it, I didn’t but I used a small pinch of dried chilli flakes instead


Finely chop ginger and garlic and roughly chop tomatoes
Place into a large pan with the vinegar and the salt, sugar and chilli (if using), bring to the boil and then simmer for 2 hours until thickened


Bottle as usual


I'm looking forward to trying this with some cold sliced ham and potato salad, yum!